Enable BIOS and UEFI Boot for PXE in DHCP
A boot is a boot, unless it doesn’t boot….
Question:
Why can’t I just network boot this new hardware and image it like I’ve always done? What in the “farfrommovin” (or insert your own expletive here) is going on here?!
Answer:
New computers (tablets, laptops, desktops, etc) all have secure boot enabled these days. I know… this only begs another question by some of us. “What is secure boot, and why do I care?”
I hear questions like this more often that you might think. So, let’s break it down so that everyone is on the same page…
A Tale of Two Boots…
Network BIOS Boot (Legacy PXE Boot)
Let’s start simple with the boot type that everyone understands.
BIOS Boot is the old school boot-up method that everyone has been using since cavemen walked the earth with my dad (not really, but you get it). It’s tried and true, it works.
BIOS boot leverages 16-bit code that is used to enable the network interface and reads the first sector of the hard disk before running additional code, like a Network Boot Program (NBP).
UEFI Boot (Secure PXE Boot)
What is UEFI?
UEFI stands for Unified Extensible Firmware Interface. It’s a specification that defines a software interface between the operating system and the platform firmware. It was developed by Intel Corporation initially back in the last century (feel left behind yet?), when they were working on their Itanium processors. It was called EFI then. In or around 2005 or so, they stopped and began contributing to the Unified version specification. Version 2.1 of UEFI added cryptography, network authentication, and user interface architecture back in 2007. Today, the version is 2.7; not sure what was added or tweaked, but I’ll look that up later…
So, as you might have deduced already, we call UEFI “Secure Boot” because of these two gems that allow us to protect against unknown image snatchers and evil doers…
- Cryptography
- Network Authentication
Summary
In an age of “OH MY GOD! SOMEONE COULD STEAL MY DATA?!” we tend to lean toward the secure side of things so that we can move on to other more pressing matters instead of chasing data (and our tails) when data gets hijacked. This is why UEFI is the mainstream boot process we use now.
Keeping the lights on while changing the bulb…
This leads us to the reason for this write-up… or main question…
How do I enable UEFI boot for my new devices, while making sure that the older devices can still be imaged?
To get everything working we need to do a couple of things.
- Create/ Define DHCP Vendor Classes
- Create/ Set DHCP Server Policies
Requirements
- DHCP Server running Windows Server 2012 or higher
- Windows Deployment Services
- Client that will boot using Legacy BIOS PXE
- Client that will boot using UEFI PXE
- DHCP Administrator rights on the DHCP Server(s)
Assumptions
- DHCP is installed and functional within your environment
- You have the appropriate permissions within DHCP
Create/ Define DHCP Vendor Classes
First, we’ll define our vendor classes. To do this, log onto your DHCP server and perform the following actions:
- Open the DHCP Snap-in
- Connect to the DHCP Server
- Navigate to DHCP > SERVERFQDN > IPv4
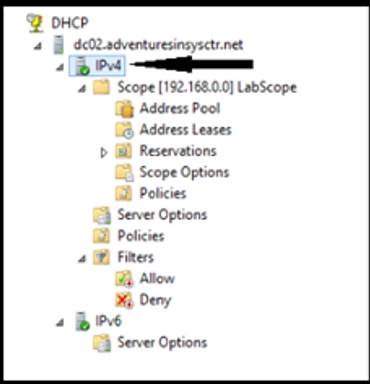
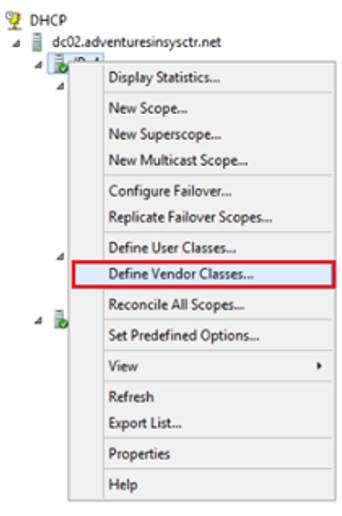
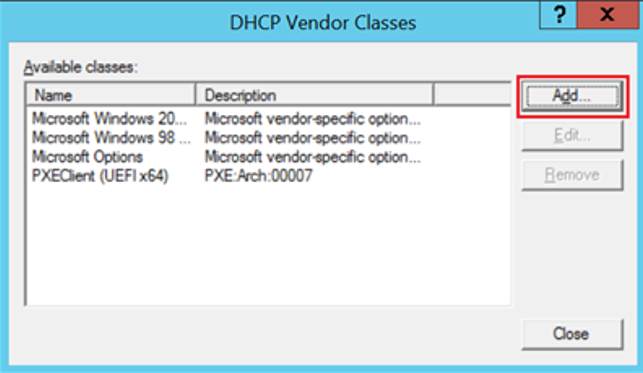
- Right-click on IPv4 and select “Define Vendor Classes…” from the menu
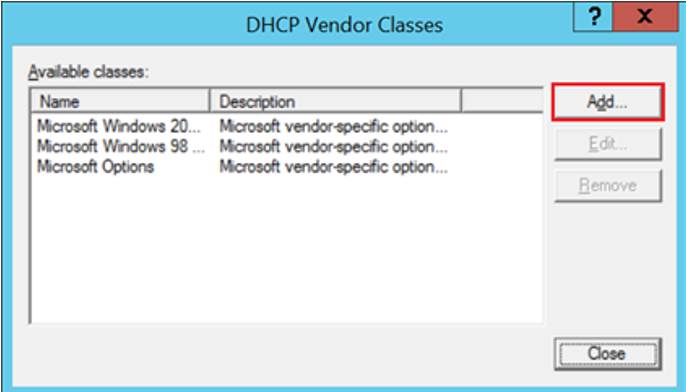
- Click the “Add…” button
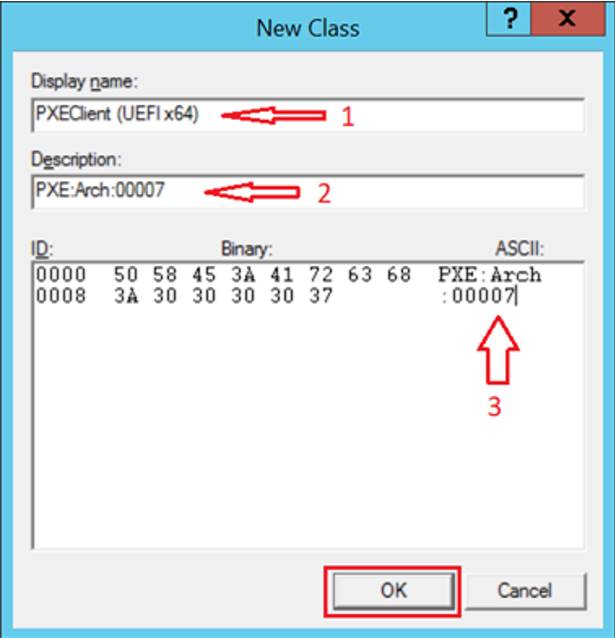
- Enter the following information, then click “OK”
- Display Name = PXEClient (UEFI x64)
- Description = PXE:Arch:00007
- ASCII = PXE:Arch:00007
- Click “Add…” again
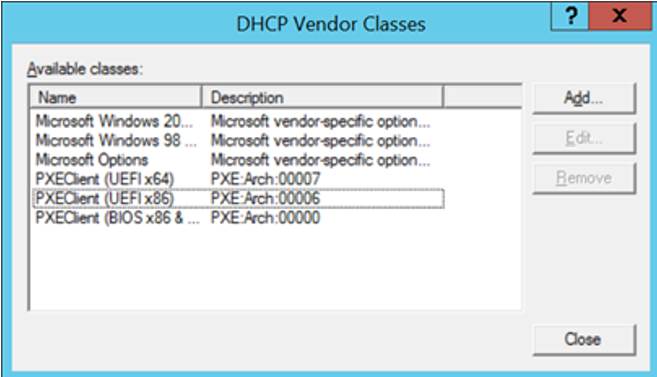
- Perform step 6 & 7 above two more times to add the classes for 32bit UEFI and Legacy BIOS
- 32bit UEFI
- Display Name = PXEClient (UEFI x86)
- Description = PXE:Arch:00006
- ASCII = PXE:Arch:00006
- Legacy BIOS
- Display Name = PXEClient (BIOS x86 & x64)
- Description = PXE:Arch:00000
- ASCII = PXE:Arch:00000
- 32bit UEFI
- Once completed, you should see something like the screen shot below with our three shiny new classes…
Create/ Set DHCP Server Policies
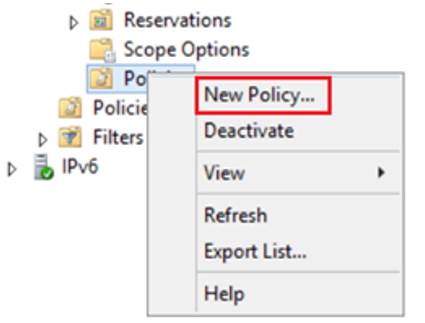
- In the DHCP console, right-click on the “Policies” container.
- For ALL SCOPES, choose the “Policies” container at the “IPv4” level.
- For SINGLE SCOPE, choose the “Policies” container for the specific DHCP scope

- Select “New Policy…” from the menu to open the policy wizard.
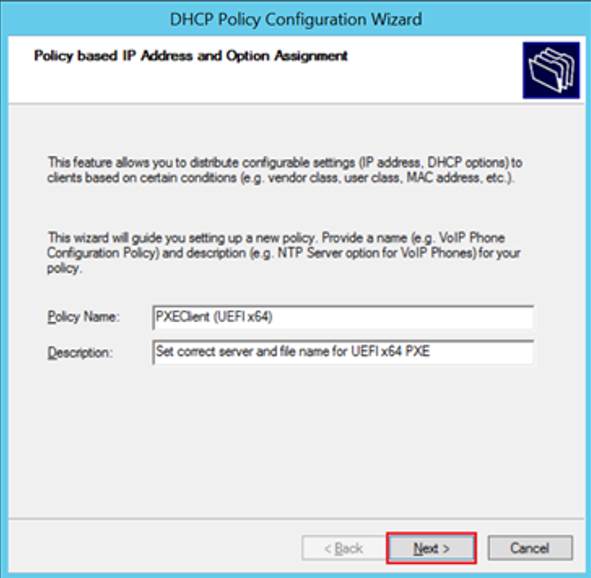
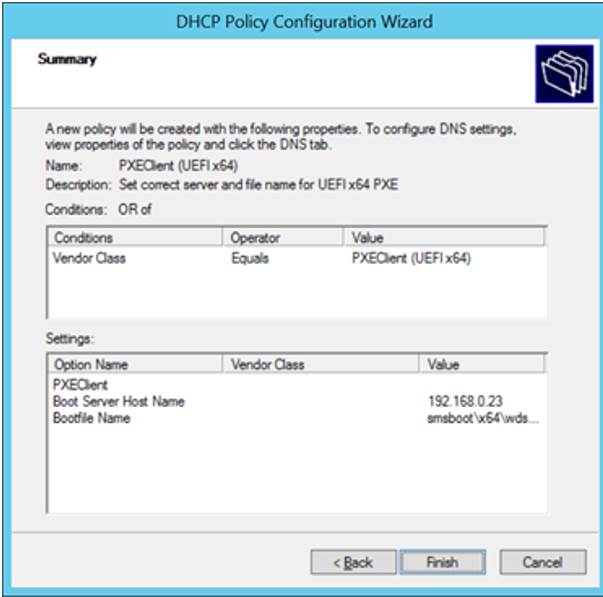
- In the wizard, enter the following information and then click “Next”.
- Policy Name = PXEClient (UEFI x64)
- Description = Set correct server and file name for UEFI x64 PXE
- Ensure that the radio button next to “OR” is selected, then click “Add…”
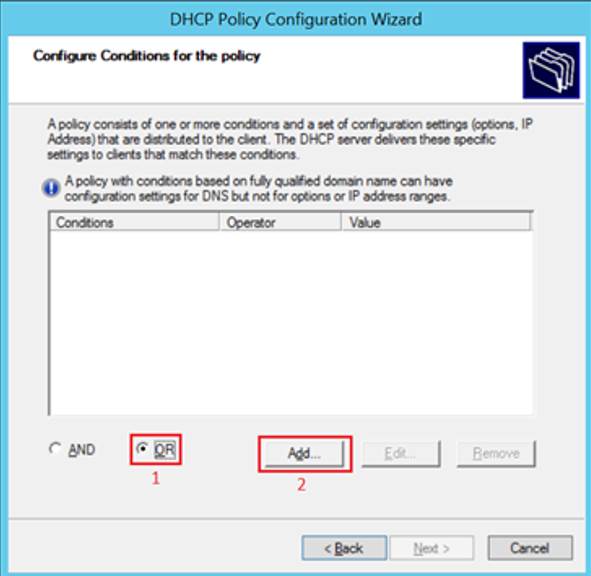
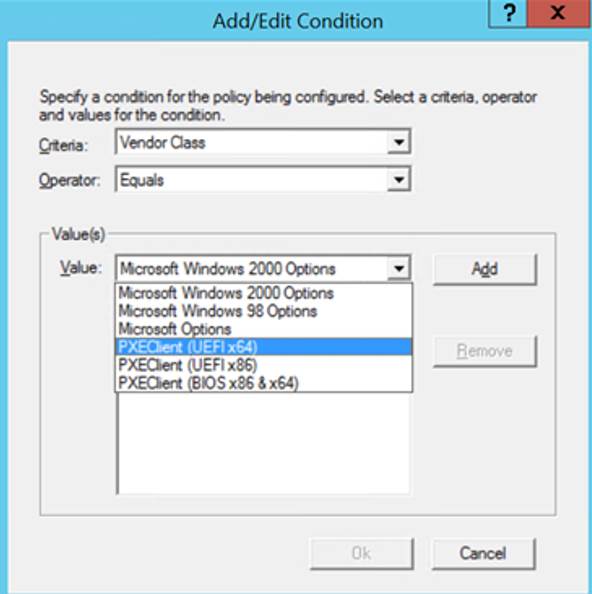
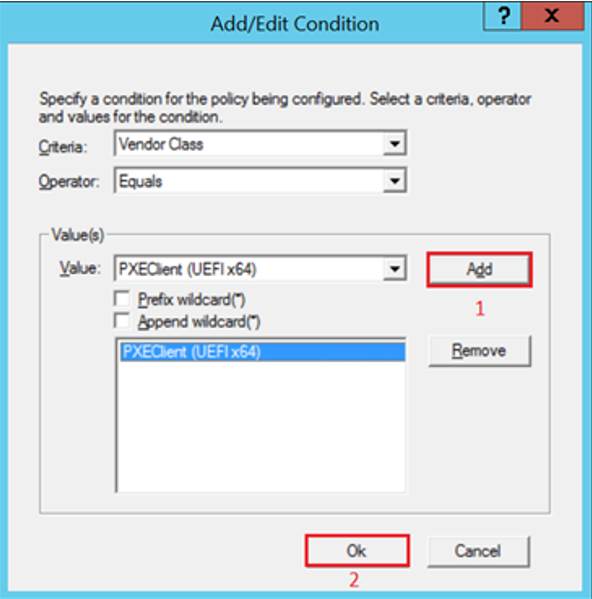
- Using the drop-down menu next to “Value”, select “PXEClient (UEFI x64)” from the list.
- Click “Add…”, then click “OK”
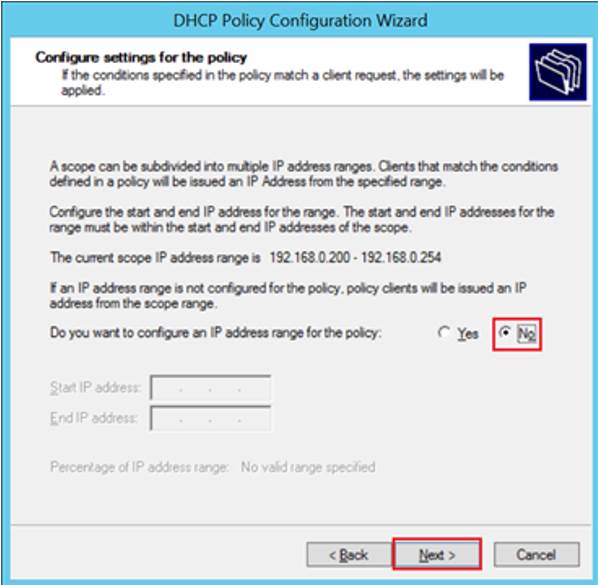
- Click “Next” on the wizard
- Select “No”, then click “Next”
- For the options, we will be setting the following under “DHCP Standard Options” in the wizard:
- Option 60
- PXEClient
- Option 66
- IP Address of the PXE Boot Service Point (the SCCM DP for you ConfigMgr types)
- Option 67
- “smsboot\x64\wdsmgfw.efi”
- Option 60
- Click “Next”, then review the settings summary information. If all of it looks right, click “Finish”
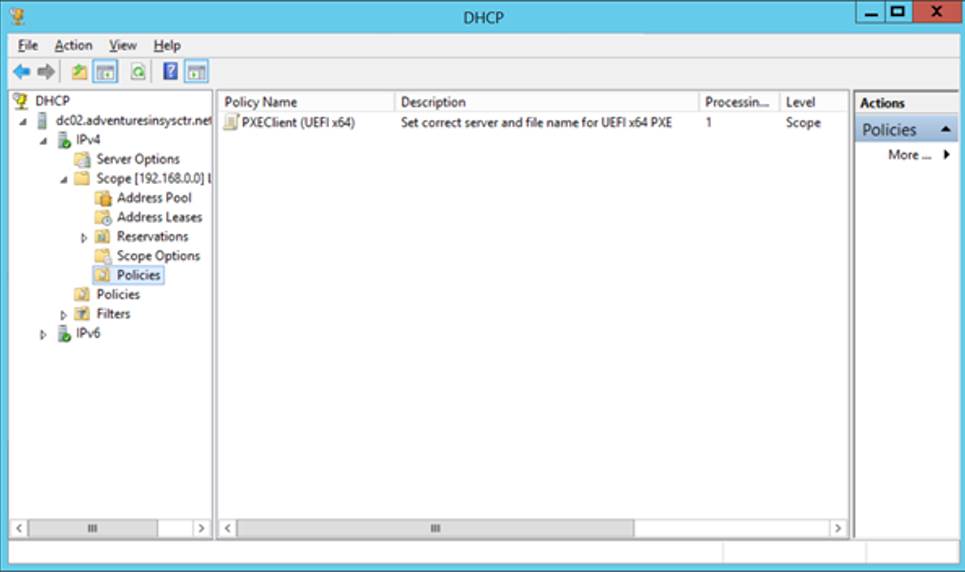
- You should now have the first of the three policies needed.
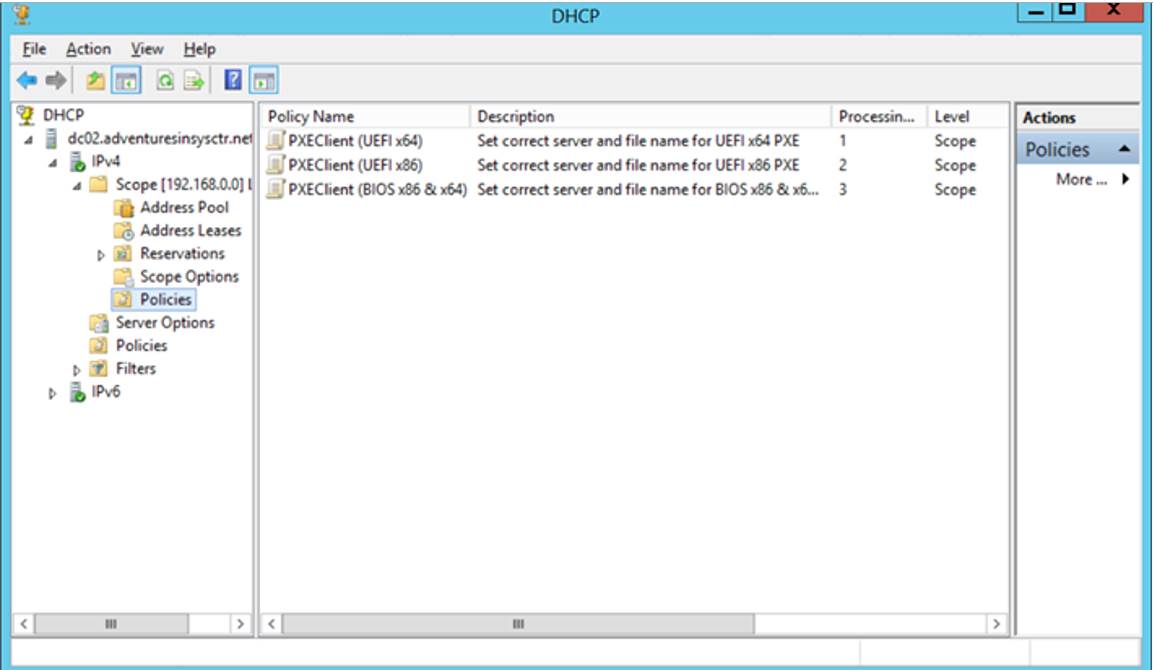
- Repeat steps 2 through 10 above for the remaining policies. Below are the tables with the information you’ll need.
Policy Information – UEFI 32bit PXE
| Display Name | PXEClient (UEFI x86) |
| Description | Set correct server and file name for UEFI x86 PXE |
| Option 60 | PXEClient |
| Option 66 | PXEBootServerIP |
| Option 67 | smsboot\x86\wdsmgfw.efi |
Policy Information – Legacy Boot PXE
| Display Name | PXEClient (BIOS x86 & x64) |
| Description | Set correct server and file name for BIOS x86 & x64 PXE |
| Option 60 | PXEClient |
| Option 66 | PXEBootServerIP |
| Option 67 | smsboot\x64\wdsnbp.com |
After you’ve completed all the policies, you should see something like I have below…
未经允许不得转载:王冬生博客 » Enable BIOS and UEFI Boot for PXE in DHCP